So you’re staring at your outdated bathroom, wondering where on earth to start?
I’ve been there, and let me tell you – bathroom renovations are like a puzzle where all the pieces need to fit in the right order.
Let’s break down this process into something that actually makes sense.
First Things First: The Planning Phase
The Not-So-Sexy But Super Important Stuff
Before you even think about picking out that gorgeous vanity you’ve been eyeing, you need to get down to the nitty-gritty.
Trust me, I learned this the hard way – there’s nothing worse than realizing your dream shower won’t fit because you didn’t check the plumbing layout first.
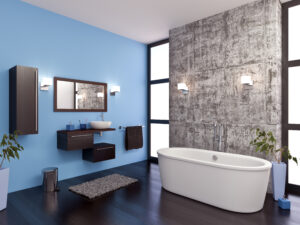
Beautifully Renovated Bathroom in NJ
Start with a complete inspection of your bathroom’s bones: plumbing, electrical, and any water damage lurking behind those walls. If you find any issues here, they just jumped to the top of your to-do list. It’s like building a house – you don’t put up the walls before you’ve got a solid foundation.
The Demo Phase: Out With The Old
Controlled Chaos is Key
Here’s where the fun (and the mess) begins. Remove everything in this order:
- Mirrors and accessories (careful with that mirror – seven years of bad luck is not part of the renovation plan)
- Cabinets and vanity
- Toilet (after turning off the water, unless you fancy an impromptu swimming pool)
- Old flooring
- Tiles
- Any damaged drywall
Pro tip: Set up a clear path to your dumpster or debris bin before you start. Your back will thank me later.
The Behind-the-Scenes Work
Plumbing: The Hidden Hero
Once everything’s stripped down to the studs, it’s time to tackle any plumbing updates. This is when you move pipes if you’re relocating fixtures, install new shut-off valves, or upgrade that ancient galvanized plumbing. Remember – plumbing mistakes can be catastrophic, so unless you’re a licensed plumber, this might be where you call in the pros.
Electrical: Power Moves
Next up is electrical work – another area where DIY enthusiasm should take a backseat to professional expertise. This is your chance to:
- Add better lighting
- Install that fancy heated floor system
- Put in a modern ventilation fan
- Add more outlets (because one is never enough)
Building It Back Up
The Wall Game
Now we’re getting somewhere! Here’s your sequence:
- Install cement board or waterproofing membrane in shower/tub areas
- Repair or replace drywall
- Prime the walls
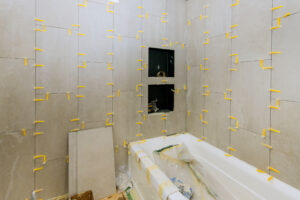
- Tile the shower area first (walls before floor)
- Paint the ceiling (yes, before the walls – trust me on this one)
Flooring Fundamentals
Once your walls are handled, it’s time for flooring. Whether you’re going with tile, vinyl, or another material, make sure your subfloor is solid and level. Nothing ruins a beautiful bathroom faster than tiles that crack because the floor wasn’t prepped properly.
The Home Stretch
Installing the Main Players
Here’s where your bathroom starts looking like, well, a bathroom again:
- Install the bathtub or shower doors
- Mount the vanity and sink
- Place the toilet (hopefully you kept the wax ring handy)
- Add lighting fixtures
- Hang the mirror
- Install towel bars and other accessories
The Final Touches
Details Make the Difference
Last but not least, it’s time for:
- Caulking around everything (and I mean everything)
- Installing switch plates and outlet covers
- Adding your shower curtain or glass door
- Setting up storage solutions
- The final cleanup (because construction dust gets everywhere)
Remember, a bathroom renovation is like a dance – each step needs to flow into the next. Rush the sequence, and you’ll end up having to redo work or, worse, deal with water damage down the line. Take your time, follow the order, and don’t be afraid to call in pros for the technical stuff.
And here’s a final piece of wisdom from someone who’s been there: always (and I mean always) have a backup bathroom plan during renovations. Nothing tests a family’s patience quite like fighting over the last working toilet in the house.
Whether you’re doing a full gut job or just updating the major pieces, following this order will help ensure your new bathroom isn’t just beautiful, but built to last. Now go forth and renovate – just don’t forget to take plenty of “before” pictures. You’ll want those for the dramatic reveal!